Set Up Your Local Deep Learning Environment
In this tutorial, we’ll guide you through the essential steps of building a TensorFlow and a PyTorch working enrivonment on your local machine. For the course we'll be using TensorFlow, but PyTorch is also a very popular framework that you might encounter in the future.
System requirements
- Windows 7 or later, macOS 10.12.6(Sierra) or later and Ubuntu Linux 14.04 or later.
- CUDA-capable GPU with compute capability higher than 3.0 (we suggest local machines with GPUs of compute capability lower than 3.0 to install CPU version of Tensorflow, skip Step 3 and 4). Check out CUDA GPU for your card’s compatibility. Laptops are usually equipped with NVIDIA GeForce or Quadro graphics cards.
- Note: Mac products are not originally equipped with NVIDIA GPUs, so macOS users can install a CPU version of Tensorflow to debug your code on your local machine (skip Step 3 and 4). GCP is suggested for Mac users to make full use of GPU.
Contents
- Step 1: Anaconda Installation
- Step 2: Create Anaconda virtual environment
- step 3: Install CUDA and GPU drivers
- Step 4: Install cuDNN
- Step 5: Install TensorFlow
- Step 6: Install PyTorch (optional)
Installation Guide
Note: The process is time-consuming/complex for starters, so please prepare an external power supply if necessary. For reference, an official instruction is here: https://www.tensorflow.org/install/.
Step 1: Anaconda Installation
Anaconda is the most popular Python data science platform. It provides a Python package manager that lets you install, update and remove packages.
- Go to https://www.anaconda.com/download/ and download the latest version of Anaconda of Python 3.6 for your laptop.
- Install Anaconda to your local work station, follow the instructions on https://docs.anaconda.com/anaconda/install/. If you have installed Python before, the Anaconda installer will prompt you whether you want to use Anaconda Python as your system default Python interpreter. It’s recommended that you use Anaconda Python as your system default Python.
- Check if Anaconda is correctly installed:
- Windows: open a Windows command prompt window by pressing
win+R and typing
cmd. In the window, typepythonand hit Enter. If you see the following python interpreter, which indicates it is an Anaconda interpreter, then it is finished. Typeexit()to quit Python. - Linux/macOS: open a console/terminal, and the rest is the same as in Windows.
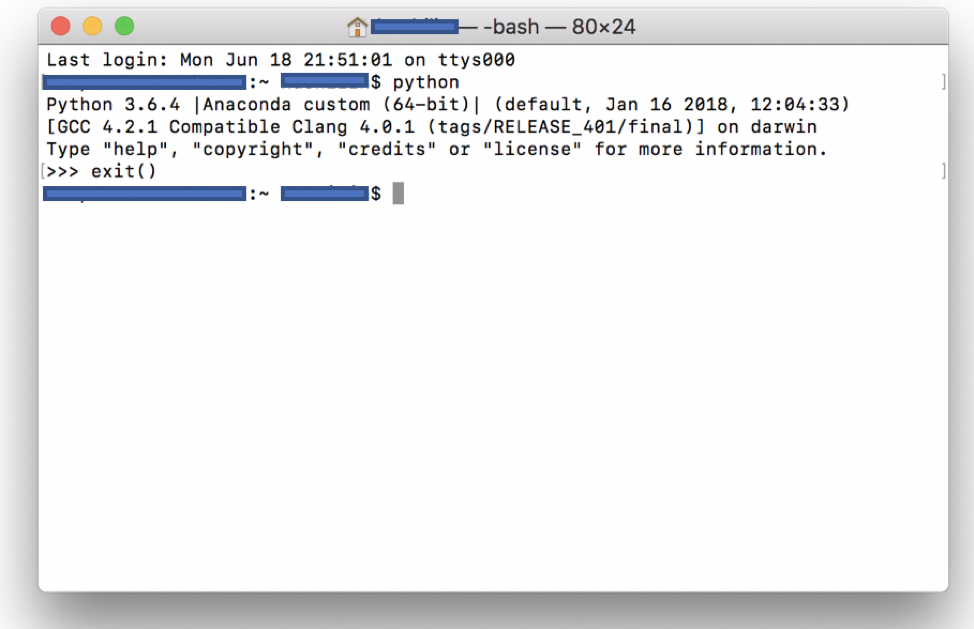
- If
pythondoesn't work (in which case the system doesn't find this command), or the interpreter is not the Anaconda interpreter (in which case you've installed Python before and Anaconda is not specified as your default Python), you may choose one of the following three:- Try reinstalling Anaconda again;
- Search "anaconda prompt" in your system and use it. This works as well.
- Locate the path where the Anaconda python executable is installed, and include it into your
system's PATH environment variable. Instructions
on how to update PATH variable can be found here: Windows
and Ubuntu. After that, type
pythonagain to test.
- You can use
conda listin the command window to see all the packages you’ve installed.
- Windows: open a Windows command prompt window by pressing
win+R and typing
Useful link for further information about Anaconda: https://docs.anaconda.com/anaconda/.
Step 2: Create Anaconda virtual environment
We are going to create a virtual environment on this Anaconda platform, and install necessary
modules. A virtual environment is a named, isolated, working copy of Python that maintains its own files,
directories and paths so that you can work with specific versions of libraries or Python itself without
affecting other
Python projects. Virtual environments make it easy to cleanly separate different projects and avoid problems
with different
dependencies and version requirements across components. The conda command is the preferred interface for
managing
installations and virtual environments with the Anaconda Python distribution.
(getting strated with conda.)
- In the command window, type
conda create -n dlenv python=3.6. Python has now release 3.7 but tensorflow is not compatible with it, please stick with python 3.6 for now. If you wish, you can replace the name that we chose for the virtual environment 'dlenv' with the name of your choice. - After installation, type
activate dlenvto activate the virtual enrivonment. (For Linux/macOS users, typesource activate dlenv) Your command prompt will contain the name of your environment, as in the cmd window below.
- Install some necessary packages into your environment 'dlenv' for future use. For example, to install
multiple packages,
type
conda install pandas numpy scipy pillow matplotlib scikit-learnin the command window. Also, remember toconda install jupyter notebook.Note: Many tool packages can be installed either using
condaorpipand the choice may not be obvious. In this tutorial, we explicitly state what to use, but if you need some other tools, you will have to examine how to load. - To list all of your virtual environments, activate/deactivate and switch between them, see getting strated with conda or managing conda.
Step 3: Install CUDA and GPU drivers
Compute Unified Device Architecture (CUDA) is a parallel computing platform and programming model created by NVIDIA. It harnesses the full power of graphics processing units (GPUs) for deep learning purposes.
- Check your GPU driver. If your driver is up to date, skip this step; if not, go to http://www.geforce.com/drivers, select, download and install the driver specific to your machine.
- Download CUDA: go to https://developer.nvidia.com/cuda-90-download-archive. Download the toolkit compatible with your computer. At the time writing this document, the latest version of CUDA Toolkit doesn’t compile with TensorFlow v1.8. However, CUDA 9.0 is enough for course use.
- Install CUDA: install CUDA to your local machine. Remember the install path because it’ll be helpful during cuDNN installation. This installation can last for tens of minutes.
-
- Detailed instructions for CUDA installation are shown in cuda-installation-guide-microsoft-windows. If you run into problems, you can refer to it first.
- Some CUDA components require prior installation of Microsoft Visual Studio. For the course you may choose "No" if they pop up.
Step 4: Install cuDNN
cuDNN is a GPU-accelerated library for deep learning.
Note 1: This step requires you to create an NVIDIA account.
Note 2: For this step, if you're familiar with PATH environment variable setup, you can follow the official instructions provided after you login with your account. The following is a more understandable way.
Note 3: If this step goes wrong, you can still install the rest, but when you initiate TensorFlow you will probably see a message: Couldn't open CUDA library cudnn.so.x. The computation speed might be compromised.
- Go to https://developer.nvidia.com/rdp/cudnn-download to download cuDNN v7.0.5, for CUDA 9.0. There are higher versions but we don’t need them.
- Extract the downloaded file. There would be 3 directories named ‘lib’,‘include’ and ‘bin’.
- Go to the CUDA install path. There you will also see 3 folders with the same names:
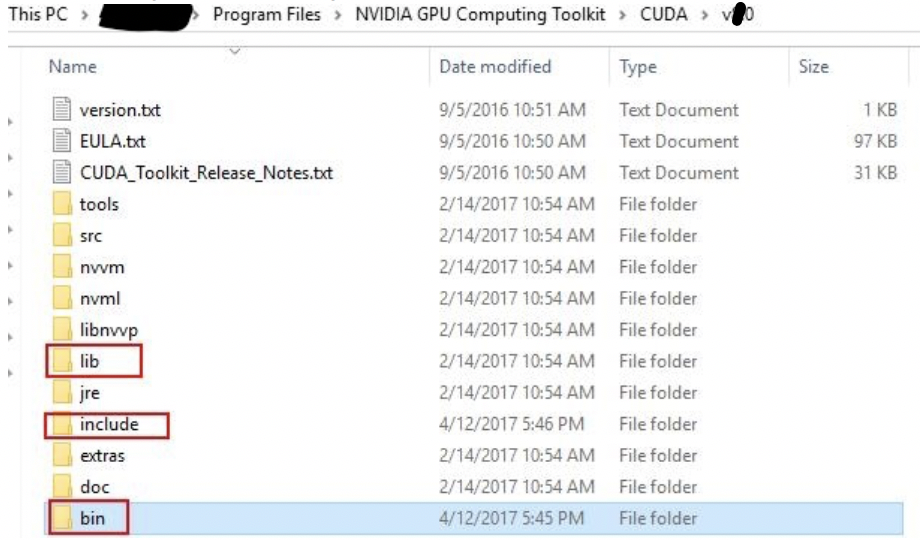
Put the contents of cuDNN into their corresponding CUDA path, i.e., move the files under cuDNN ‘bin’ directory to CUDA ‘bin’ directory, and do the same to ‘include’ and ‘bin’.
Step 5: Install TensorFlow
TensorFlow is an open source deep learning framework created and maintained by Google Brain Team. It is the most popular deep learning framework nowadays.
Note:There are newer versions of Tensorflow released, you can install them following official guide, but we suggest you use the same version as your gcp instance.
For windows users:
- Go to the command prompt (or anaconda command) window, and make sure that your virtual environment is activated.
- If you simply want to use CPU version of TensorFlow, in the command window, type:
pip install --ignore-installed --upgrade tensorflow==1.8.0 - If you want to enable GPU for TensorFlow, in the command window, type:
pip install --ignore-installed --upgrade tensorflow-gpu==1.8.0
For Ubuntu users:
- Go to the command prompt (or anaconda command) window, and make sure that your virtual environment is activated.
- If you simply want to use CPU version of TensorFlow, in the command window, type:
pip install --ignore-installed --upgrade \ https://storage.googleapis.com/tensorflow/linux/cpu/tensorflow-1.8.0-cp36-cp36m-linux_x86_64.whl - If you want to enable GPU for TensorFlow, in the command window, type:
                pip install --ignore-installed --upgrade \
                https://storage.googleapis.com/tensorflow/linux/gpu/tensorflow_gpu-1.8.0-cp36-cp36m-linux_x86_64.whl
For macOS users:
- Go to terminal and make sure that your virtual environment is activated.
- Install CPU version of TensorFlow, type:
                pip install --ignore-installed --upgrade \
                https://storage.googleapis.com/tensorflow/mac/cpu/tensorflow-1.8.0-py3-none-any.whl
Note: Always try to activate your virtual environment.
- For Ubuntu users, building from source is a better way of installing TensorFlow, but requires very complicated steps and some time. If you’re interested, visit TensorFlow build from Sources.
- Verify that TensorFlow is correctly installed. In the command window, type
python, and then type:>>>import tensorflow as tf >>>a = tf.constant('Hello TensorFlow!') >>>with tf.Session() as sess: ... print(sess.run(a)) # If you see the following output, then you're all set! b'Hello TensorFlow!' - Now, let's try it on Jupyter Notebok. Make sure you have installed jupyter notebook in your virtual environment.
As the figure below shows, first
activateyour virtual environment, thenjupyter notebookto start Jupyter, new a Python 3 notebook and type the above commands again to test.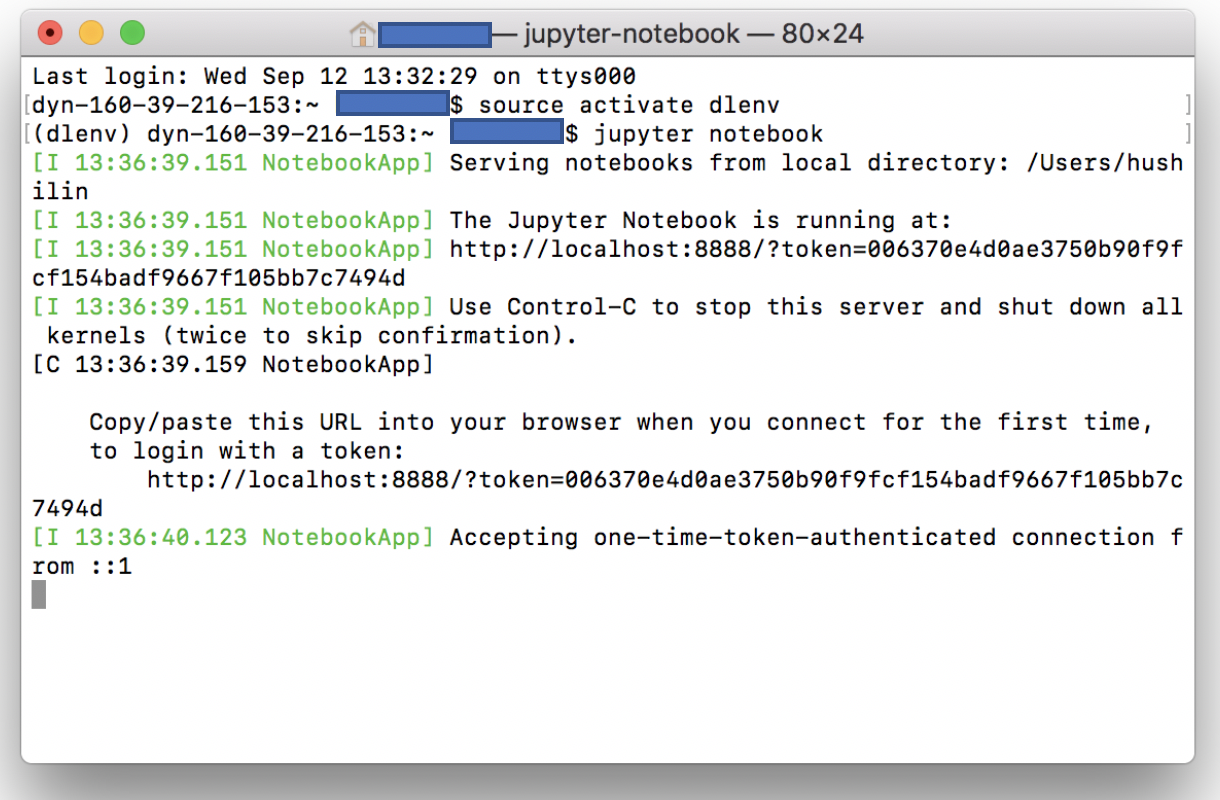

Step 6: Install PyTorch (optional)
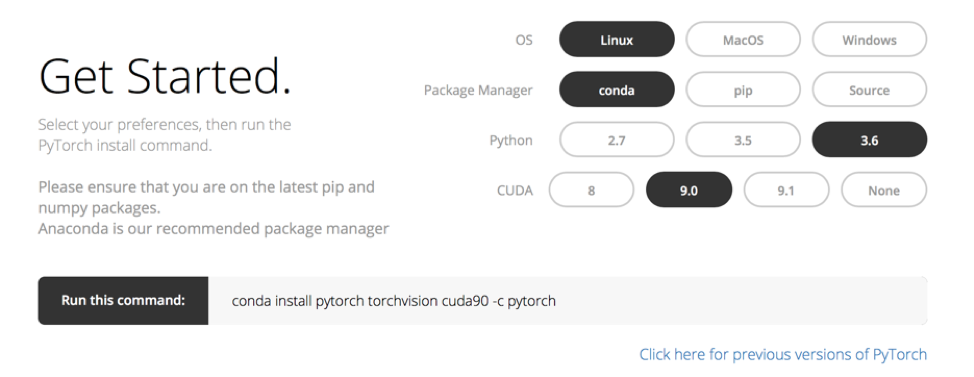
PyTorch is another open source machine learning framework for Python, based on Torch. It is developed by Facebook's artificial-intelligence research group. Compared to TensorFlow, PyTorch has its own advantages such as dynamic network design.
To install PyTorch, go to the official website http://pytorch.org/ and follow the install instructions.
ECBM E4040 Neural Networks and Deep Learning, 2017.
Columbia University